This post is a summary of the presentation I held at the JAX 2013 in Mainz. It has been a real exciting experience for me to be a speaker at the JAX. I had this opportunity due to my new employer the Inovex GmbH, for which I’m very greatful.
The Goal of the presentation and therefore of this blog post is to show the possibilities of combining a integration solution like Apache Camel with a clustered Apache Karaf by using Apache Karaf Cellar.
Clustering Apache Karaf with Cellar
The Cellar project is a subproject of the Karaf Server, it enables Karaf to be run in Clustered environment. The basis of Cellar is a Hazelcast based memory cluster configuration which replicates itself to all known nodes in the cluster. For details on how Hazelcast does this take a look at the project documentation. (hazelcast-documentation)
The default configuration for Hazelcast is to search for other instances within the same subnet through multicast. By doing so it’s quite fast in detecting other instances and at that point the Karaf servers start to synchronize the configuration and the state of the servers.
At this point Cellar is already helping in farming a cluster. For example if one of the server does retrieve a new bundle this information is distributed among the other nodes for them to also install this bundle. To make sure not every configuration or installed bundle (or features) is distributed a black and whitelisting is possible. Below is a simple sample of how a feature is “farmed” on both nodes, and the second one shows how one feature is blocked by the blacklisting.
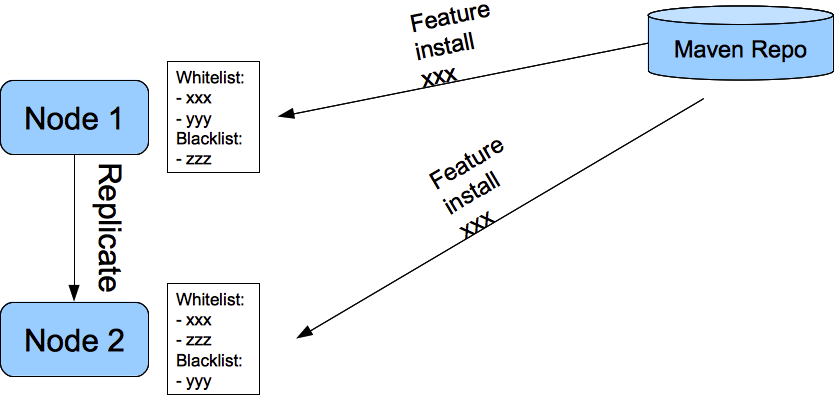
Farming feature XXX:
- Installing feature XXX on Node1, by issuing command features:install xxx
- Node1 replicates this information throughout the cluster
- Node2 picks up this information and installes the required feature.
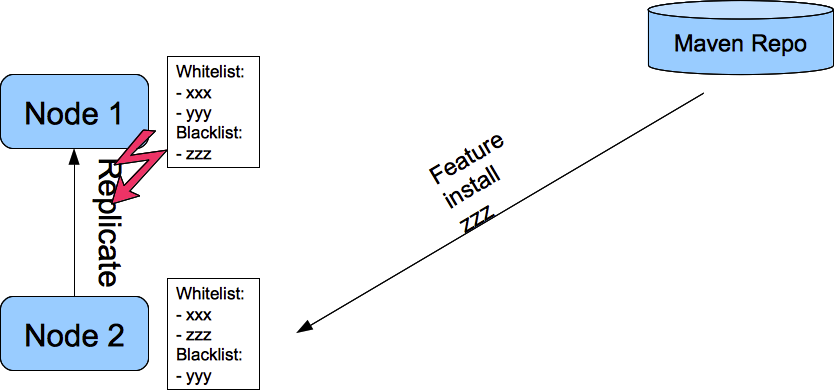
Blocking feature:
- Installing feature ZZZ on Node2, by issuing the command features:install zzzz
- Nod2 informs the cluster
- Node1 checks black/whitelists and discards the information
Karaf in the Cloud, or how to discover other nodes on a cloud system
Besides working in a closed network environment where multicasting is applicable it might be needed to run this kind of setup in a Cloud environment like for example on a Amazon Cloud system. When running in a cloud system the nodes are not able to find each other with sending multicast requests, another drawback of running in a cloud environment you never know if your node will have the same IP in case it has been shut down. Therefore it’s vital for a Cloud environment that all nodes are able to find each other in another way. For example to store the information in a cloude wide visible storage, e.g. a S3 bucket. This can either be achieved by configuring the underlying hazelcast instance to do a AWS multicast by using a S3 storage or let Cellar itself do this. Since the focus of this blog is on showing how to do this with Cellar the shown solution is using the Cellar-Cloud feature.
Cellar is able to find other nodes by using a cloud storage system. At first it will look for the configured storage system and will try to find the required objects at this location which should contain the information needed to connect to the other nodes of the “Cloud-Cluster”.
Showcase for distributed Cloud/Cluster working
Now it’s time to start with a working example on how all this works together.
Requirement
First of all three separate Karaf instances, which are not supposed to know each other and a S3 storage is needed. For small use-cases you’re able to retrieve free test environments at Amazon.
You’ll also need a java compiler and maven installed, since you’re going to need to compile this sample and possibly the latest version of Apache Karaf-Cellar.
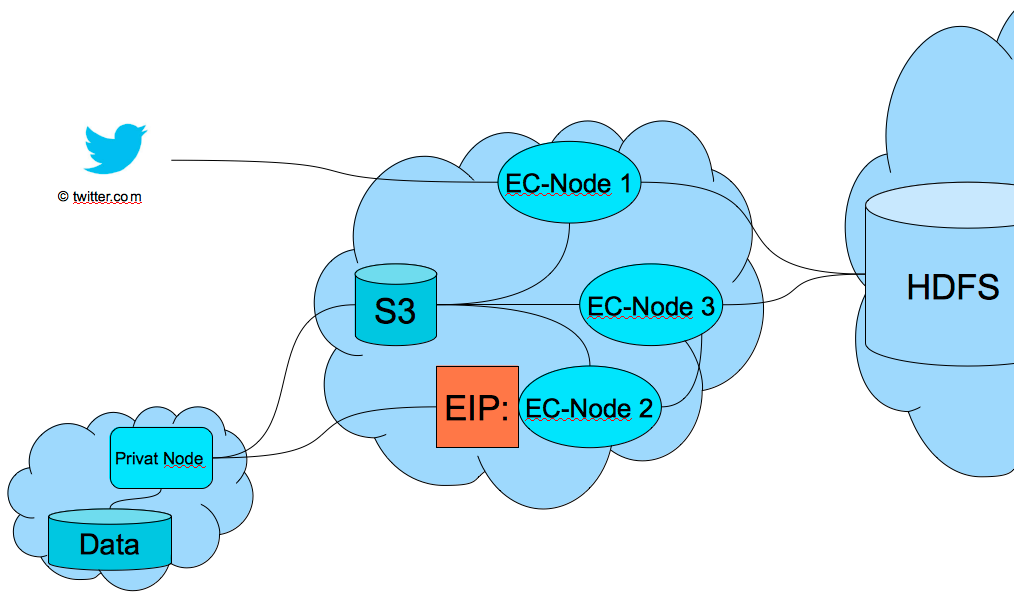
The initial setup of this showcase contained of three instances, two of those instances where deployed to two separate Amazon EC2 Linux images. The third instance was run locally. The Exchange of the IP Adresses for the Karaf Cluster on the Amazon EC2 systems was achieved by using a S3 Bucket and cellars own discovery method.
For the CXF Webservice an external usable IP is needed, therefor an Elastic IP was attached to one of the two EC2 instances.
How does it work
This Sample provides three modules, each module will be installed on a separate Karaf Instance. The first instance will call a CXF Webservice on the first Amazon EC2 instance. This first EC2 system in return will send the message retrieved to a hazelcast queue provided by the Karaf-Cellar infrastructure. The second Amazon EC2 instance will retrieve the message from the hazelcast queue and will write the result to the S3 bucket.
Using this Showcase
Download Karaf in version 2.2.9. You’re going to find this version of Karaf at the download location. Along with Karaf you’re going to need to use Cellar 2.2.6, it’s currently not released but coming within days.
For this showcase it’s required to do a clean rebuild of Cellar 2.2.6-SNAPSHOT.
Building Apache Karaf Cellar
Get the sources from SVN by using the following:
svn co https://svn.apache.org/repos/asf/karaf/cellar/branches/cellar-2.2.x
change to the cellar-2.2.x folder and issue a maven build
mvn clean install
Building showcase
Retrieve the sources from the Inovex GitHub at this location and call the following command in the base folder:
mvn clean install
This will create all needed modules a features.xml for the project defining all needed dependencies. As an extra it’ll also build pre-configured Karaf instances for easy usage. Even though those are available, it’s better to follow the instructions below for an easier understanding.
Installing cellar
Extract the retrieved Apache Karaf zip or tar.gz to location of your choice. For the Local node and the CXF-Consuming Node (the one with the EIP) you need to rename the jre.properties file in the etc folder to jre.properties.orig and copy the jre.properties.cxf file to jre.properties. This is needed for CXF to run smoothly with Apache Karaf, and won’t be needed with Apache Karaf >= 2.3.0.
Start the Apache Karaf server by calling karaf from within the bin folder. Right after you started the server we need to make sure it’s running with equinox (while working on this showcase my OSS colleague JB and I discovered some real strange issus with Felix).
dev:framework equinox
dev:restart -c
On the first Node of your cluster environment, where you changed the jre.properties to use the cxf needed configuration you need to install some bundles first. Without those you’re going to receive some unwanted errors when installing cellar.
install -s mvn:org.apache.geronimo.specs/geronimo-annotation_1.0_spec/1.1.1
install -s mvn:org.apache.servicemix.specs/org.apache.servicemix.specs.activation-api-1.1/2.0.0
install -s mvn:org.apache.servicemix.specs/org.apache.servicemix.specs.stax-api-1.0/1.9.0
install -s mvn:org.apache.servicemix.specs/org.apache.servicemix.specs.jaxb-api-2.2/1.9.0
Preparation is done now, let’s start installing Apache Karaf Cellar by first registering the features.xml:
features:addurl mvn:org.apache.karaf.cellar.samples/camel-hazelcast-app/2.2.6-SNAPSHOT/xml/features
and second installing the required feature:
features:install -v -c cellar-cloud
Now you have to possibilities of installing the showcase either the lazy all-in-one feature or by using the farming possibilities. Since we’re here to have some fun let’s take a look on the farming version first.
Installing the showcase with Farming!
First of all we need to make sure the correct configuration is set for cellar. Cause we don’t want every feature to be synchronized to the complete cluster.
config:edit org.apache.karaf.cellar.groups
config:propappend default.features.blacklist.outbound ,showcase-cxf-consumer-light
config:propappend default.features.blacklist.outbound ,showcase-hazelcast-consumer-light
config:propappend default.features.blacklist.outbound ,camel-aws
config:propappend default.features.blacklist.inbound ,showcase-cxf-consumer-light
config:propappend default.features.blacklist.inbound ,showcase-hazelcast-consumer-light
config:propappend default.features.blacklist.inbound ,camel-aws
config:propappend default.config.blacklist.inbound ,org.ops4j.pax.web
config:propappend default.config.blacklist.inbound ,org.apache.karaf.cellar.cloud*
config:propappend default.config.blacklist.inbound ,org.apache.karaf.cellar.discovery
config:propappend default.config.blacklist.outbound ,org.ops4j.pax.web
config:propappend default.config.blacklist.outbound ,org.apache.karaf.cellar.cloud*
config:propappend default.config.blacklist.outbound ,org.apache.karaf.cellar.discovery
config:propset default.bundle.sync false
config:update
All machines need to know of the showcase features.xml to be added to the features repository, therefore issue the following command on only one of the nodes.
features:addurl mvn:de.inovex.jax2013.showcase/feature/1.0.0/xml/features
After done this, take a look at the second node to check if the features url has been added to the repository
features:listurl
This should show you the features repository urls. Since the showcase features.xml also contains information about the cxf and camel features repository those will show up also.
Now let the Farming beginn!
Install the camel-blueprint feature first cause it’s the basis for all other features.
features:install -v -c camel-blueprint
After this is done, check the second node again if this feature has also been installed at the second node. To list all available bundles just issue a la at the command line. Depending on the speed of the second node all bundles should be installed or even active already. After this feature has been farmed let’s install the second needed feature for the cluster.
features:install -v -c camel-cxf
Ok, so the farming did work out quite nicely, and both nodes now do have the same basic setup needed to run the showcases. Now we need to install the showcases to the dedicated servers. if you didn’t configure the nodes yet you’re required to do so otherwise you’re gonna have fun with distributed showcases 🙂
So let’s install the cxf-consumer showcase on the first node (it’s the one with the elastic IP attached to it).
features:install -v -c showcase-cxf-consumer-light
Now just for the fun of it check if this showcase is not installed on the second node 😉
So let’s get on with it and install the hazelcast-consumer showcase to the second node. But this one also needs another camel feature so we need to install two features!
features:install -v -c camel-aws
features:install -v -c showcase-hazelcast-consumer-light
So this is it, it’s that simple to distribute your features throughout the cluster and white/blacklist parts of it. At this point we just need to setup the producing node which is your local server and therefore is not connected to the cluster.
features:addurl mvn:de.inovex.jax2013.showcase/feature/0.1.0-SNAPSHOT/xml/features
features:install -v showcase-cxf-producer
Now we only need to configure the three nodes correctly to get on with it, so you should skip the next “chapter” and need to go directly to the configuration description.
Installing the showcase with one Go!
before installing the showcase feature we need to make sure the correct white and blacklist entries are set.
config:edit org.apache.karaf.cellar.groups
config:propappend default.features.blacklist.outbound ,showcase-cxf-consumer
config:propappend default.features.blacklist.outbound ,showcase-hazelcast-consumer
config:propappend default.features.blacklist.inbound ,showcase-cxf-consumer
config:propappend default.features.blacklist.inbound ,showcase-hazelcast-consumer
config:propappend default.config.blacklist.inbound ,org.ops4j.pax.web
config:propappend default.config.blacklist.inbound ,org.apache.karaf.cellar.cloud*
config:propappend default.config.blacklist.inbound ,org.apache.karaf.cellar.discovery
config:propappend default.config.blacklist.outbound ,org.ops4j.pax.web
config:propappend default.config.blacklist.outbound ,org.apache.karaf.cellar.cloud*
config:propappend default.config.blacklist.outbound ,org.apache.karaf.cellar.discovery
config:propset default.bundle.sync false
config:propset default.features.sync false
config:update
All machines need to know of the showcase features.xml to be added to the features repository, therefore issue the following command.
features:addurl mvn:de.inovex.jax2013.showcase/feature/1.0.0/xml/features
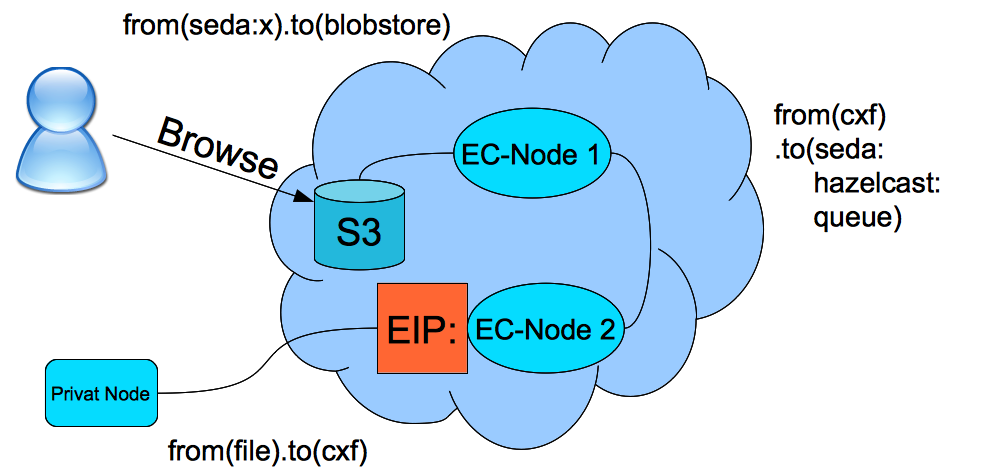
Now you’re able to install the following features dependent on their location. The private or local machine does only retrieve the cxf-producer module and therefore only the following needs to be installed on this node:
features:install showcase-cxf-producer
On the first EC2 node which is accessible through an elastic IP (EIP) install the CXF consuming route module:
features:install showcase-cxf-consumer
On the second EC2 node which only consumes internally but accesses the S3 bucket install the following:
features:install showcase-hazelcast-consumer
Configuration
All of the three nodes need some extra configuration after installation. The features install process already placed those configuration files in the `etc` folder of the Apach Karaf server.
Local Node
Edit the `de.inovex.jax2013.showcase.cxf.producer.cfg` file. and change the `cxf.remote.url` to the external CXF server to your accessible EIP. Also change the `file.location` parameter to a valid folder in your system. For example one might use the config commands as previously used for the black and whitelists.
config:edit de.inovex.jax2013.showcase.cxf.producer
config:propset cxf.remote.url http://<elastic-ip>:8181/cxf/messenger
config:propset file.location ~/Documents/importDir/
config:update
First EC2 Node
No extra configuration is needed.
Second EC2 Node
Edit the `de.inovex.jax2013.showcase.s3.producer.cfg` file.a and change the aws key and security key to your own keys. Again use the shell commands to do so:
config:edit de.inovex.jax2013.showcase.s3.producer.cfg
config:propset aws.accessKey <access-key>
config:propset aws.secretKey <secret-key>
config:propset bucket.name <bucket-name>
config:update
Running this Showcase
Now only place a text file to the configured Folder and you’ll shortly will see a `messageOut.txt` file in your S3 bucket.
I hope you enjoyed the JAX as I did and also this showcase.
Schreibe einen Kommentar